Star light, star bright,
The first star I see tonight;
I wish I may, I wish I might,
Have the wish I wish tonight.
I had a lot of fun making this DL sized shooting star card!!
Here is how you would go about making it........
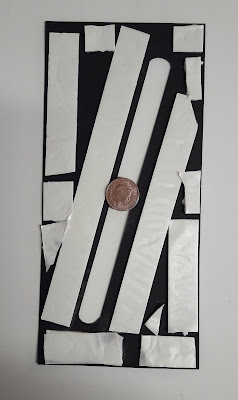
First cut 2 pieces of black card - both the same size, so they will fit onto the front of a DL size card base, with just a narrow gap showing all around when it is glued in place.
Out of one of the pieces cut a narrow band with a curved top and bottom. The band needs to be cut at an angle from top left to bottom right as shown in the photo.
To create the right width for the band measure one of the two same sized coins (I used UK One Penny Pieces) and cut the width of the band a bit smaller, so that the coins will "roll" along the cutout band without popping out - after everything is put together.
Next align one of the coins behind the cut out panel and firmly glue a circle of dimensional foam with hot glue to the coin. You want it to be stuck well and you want a small amount of clearance around the edge of the foam, so that the coin will be able to roll freely.
Now firmly glue the 2nd coin directly on top, as shown in the photo above.
Turn the card over and stick dimensional foam either side of the coin rolling mechanism and onto the rest of the card to make sure it stays firm and stable when the back is stuck down onto it.
Now stick the plain uncut piece of black card down onto the first piece, with the foam in between them, to form the back.
Check to make sure the coins roll comfortably up and down the panel piece.
Once you are happy that the mechanism is working you can decorate the front of the panel however you like, before sticking it to the card base.
To decorate mine I brushed Opal Blaze polish through a star stencil directly onto the black card. I also stuck on some glitter paper die cut stars and some blue gem stick-ons.
Onto the rolling coin mechanism I glued a larger glittery die cut star.
Finally I finished the card with a birthday wish made from hand written word blocks.


Magical penny slider card, i bet this will bring hours of fun to the recipient. Emma
ReplyDeleteThank you Emma. Only if I don't wear it out first!! 😂 😂
DeleteThis comment has been removed by the author.
ReplyDeleteFAB CARD! I'm sure the recipient will love it too.
ReplyDeleteThank you Sue. 😘
DeleteGosh I've not made a penny slider card in ages! Love all the stencilled stars and the shine from the opal blaze, fabulous creation. PS loved the little video 😊 ... Steph x
ReplyDeleteThank you Steph. The video really does help show the shine on the polish. Trying to get to grips with videos... Decent software, lighting, and more hours in the day are needed!
Delete